What do we mean by "Type Casting"?
Type casting is basically the process of changing or converting one variable from one data type to other different data types. For example, we may want to convert an integer variable data type to a long data type. For the primitive data types, The type casting can be performed only on the numbers. We can think of a char data type as a number since it is one of the Integral Data Types. We cannot perform casting on boolean.
What is an Integral Data Type?
An integral data type is a data type that represents a subset of the infinite integer set (such as byte, short, int, char, long in Java Language).
For the primitive data types, we have two types of conversion:
- Narrowing primitive conversion
- Widening primitive conversion
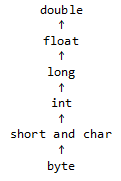
Before we continue with the meaning of each one, we have to know few things. Java data types are grouped into 3 groups, The Integral Types, Floating and the boolean. The integral group contains the types that does not have a decimal point. It includes the int, byte, short, long and the char. The floating group contains the types that has a decimal point. The floating group contains two data types, the double an the float. The boolean group contains only the boolean data type. Each data type has a specific size. The double is 64 bits, the long is 64 bits, the float is 32 bits, the int is 32 bits, the short is 16 bits, the char is 16 bits and the byte is 8 bits.
The next table shows the summary of data types sizes.
| Group | Data Type | Size |
| Floating | double | 64 bits |
| float | 32 bits |
| Integral | long | 64 bits |
| int | 32 bits |
| short and char | 16 bits |
| byte | 8 bits |
Widening Primitive Conversion
Sometimes called Automatic Type casting. It can happen when we try to cast a small size type to a larger size type. For example, we may want to convert from a short to an int. Also we can cast from Integral type to floating type in widening primitive conversion.
| Group | Data Type | Size | - |
| Floating | double | 64 bits |
 |
| float | 32 bits |
| Integral | long | 64 bits |
| int | 32 bits |
| short and char | 16 bits |
| byte | 8 bits |
This type of casting does not require any special thing in order to be completed. The next code example shows how it can be done.
Java
Java 6 and Above
public class Main{
public static void main(String [] arguments){
byte myByte = 65;
short byteAsShort = myByte;
int byteAsInt = myByte;
double byteAsdouble = myByte;
double longAsDouble = 77L;
double floatAsDouble = 67F
System.out.println("byte = "+myByte);
System.out.println("byte as short = "+byteAsShort);
System.out.println("byte as integer = "+byteAsInt);
System.out.println("byte as double = "+byteAsdouble);
System.out.println("byte as double = "+byteAsdouble);
System.out.println("long as double = "+longAsDouble);
System.out.println("float as double = "+floatAsDouble);
}
}
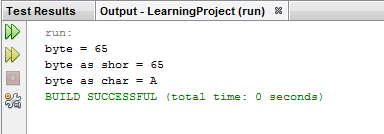
One thing to notice about widening primitive conversion is when we try to cast a byte or a short to a char. In order to cast from byte to char, we have to till the compiler that we are changing from byte to char. Same thing apply when we are casting from short to char. The following code example shows how to do that.
Java
Java 6 and Above
public class Main{
public static void main(String [] arguments){
byte myByte = 65;
short byteAsShort = myByte;
char byteAsChar = (char)myByte;
System.out.println("byte = "+myByte);
System.out.println("byte as short = "+byteAsShort);
System.out.println("byte as char = "+byteAsChar);
}
}
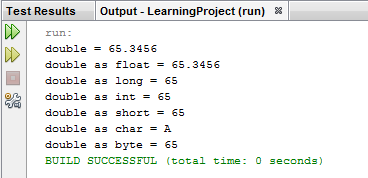
Narrowing Primitive Conversion
Narrowing primitive conversion is the opposite of Widening primitive conversion. What we do is we convert a larger size data type to a smaller one. To complete this task, we have to tell the compiler explicitly about the conversion. We do that by doing the same thing when we wanted to convert from byte to char.
| Group | Data Type | Size | - |
| Floating | double | 64 bits |
 |
| float | 32 bits |
| Integral | long | 64 bits |
| int | 32 bits |
| short and char | 16 bits |
| byte | 8 bits |
The following code example shows how it is done.
Java
Java 6 and Above
public class Main{
public static void main(String [] arguments){
double myDouble = 65.3456;
float doubleAsFloat = (float)myDouble;
long doubleAsLong = (long)myDouble;
int doubleAsInt = (int)myDouble;
short doubleAsShort = (short)myDouble;
char doubleAsChar = (char)myDouble;
byte doubleAsByte = (byte)myDouble;
System.out.println("double = "+myDouble);
System.out.println("double as float = "+doubleAsFloat);
System.out.println("double as long = "+ doubleAsLong);
System.out.println("double as int = "+doubleAsInt);
System.out.println("double as short = "+doubleAsShort);
System.out.println("double as char = "+doubleAsChar);
System.out.println("double as byte = "+doubleAsByte);
}
}
What Happened to the Decimal Point when We cast from float or double to a type that has no Decimal Point? When we cast from floating type to integral type, the number will be always truncated (the numbers after the decimal point will be cut down).
Java
Java 6 and Above
public class Main{
public static void main(String [] arguments){
double firstDouble = 88.49;
double secondDouble = 88.50;
double thirdDouble = 600.90;
double fourthDouble = 600.0001;
int firstDoubleAsInt = (int)firstDouble;
int secondDoubleAsInt = (int)secondDouble;
int thirdDoubleAsInt = (int)thirdDouble;
int fourthDoubleAsInt = (int)fourthDouble;
System.out.println("first double = "+firstDouble);
System.out.println("first double as int = "+firstDoubleAsInt);
System.out.println("second double = "+secondDouble);
System.out.println("second double as int = "+secondDoubleAsInt);
System.out.println("third double = "+thirdDouble);
System.out.println("third double as int = "+thirdDoubleAsInt);
System.out.println("fourth double = "+fourthDouble);
System.out.println("fourth double as int = "+fourthDoubleAsInt);
}
}