Showing posts with label Java Programming Language. Show all posts

Wednesday, July 12, 2017

Design Patterns Using Java: Observer Design Pattern

Introduction

One of the features that I was amazed with in Java is the way of handling events, especially in swing and JavaFX GUI applications. When I started writing my own Java libraries, I needed to implement something similar to that way. After I took a course about software design, I learned something interesting. It turns that this feature is actually something called Observer Design Pattern.


Topics Covered

In this blog post, I will cover the following topics:
  • Defenition of Design Pattern.
  • The Observer Design Pattern.
  • Implementing The Observer Design Pattern in Java.
  • A Summary of All The Steps for Implementing The Observer Design Pattern.

What is a Design Pattern?

In software engineering, a design pattern is simply a solution to a common problem in software design that can be used to solve the problem in the most effective way. An example of a design problem is how to make one instance of an object the whole life time of a program. The solution to this problem is to use one of the easiest-to-implement design patterns, the Singleton Design Pattern.

The Observer Design Pattern

The observer design pattern is also used to solve one of the common software design issues. To illustrate the problem that this design pattern solves, let's start by stating a simple example that we will implement it later in Java.

'X' 'O' Game

There are more simpler examples out there on the internet but the 'X' 'O' Game is interesting to see how we can use this design pattern in designing games. The simplest example we can think of is that an object says 'hi!' and the other replay with the same thing.

How The Game Works

The idea of the game is as follows, we have a grid of size 3x3. Two players can play at any time. The first player places 'O' on one cell. After that, the second player places 'X' on another Cell. The first one who have a line of 3 'X's or 'O's wins the game (Horizontal, vertical or diagonal). Note that it is possible to implement the game without the use of observer design pattern. But we will be using it as an example.

The Observer Place in The Game

The observer design pattern is used to implement a way for objects to listen to each other. Basically an object 'A' is waiting for an event to be done by object 'B' in order to perform some actions.

In the game, we have 3 important objects, The first player, the second player and the game board (or the paper). The two players are the ones who is doing actions. The the game board will be observing the actions.

One thing that we have to consider is which player will play next. Because once the first player finish his turn, the second one come in and play. We should not allow the first player to play again till the second player finish his turn. Also after each move, we should check if there is a winner or not.

The given problems can be solved by using the observer design pattern. The game board is interested on the moves each player makes. When a player finish his turn, the game board will check his state. If there is a winner, the game finishes. If no winner, it is the time for next player to play. If the game board is filed with 'X's and 'O's, the game finishes and it is a tie.

This means we have one observer (The game board) and two subjects (The players).
Observer Design Pattern
This is how the observer design pattern works in general.

Implementing Observer Design Pattern in Java

Since we are interested in implementing the design pattern and not the game, we will be using a semi-complete code to do that. The code can be found in my Github account under the project XOGame. There are two folders, one contains the full code and the other which has a partially implemented code. We will be working on the partially implemented version of the game.

Understanding The Code

The first thing to note is that we have 3 main java files, each file represents one class:
  • The Player Class
  • The GameBoard Class
  • The Game Class
The last one file contains the main method.

The Player Class

This class represent one player in our game. In the observer design pattern, we call this class the subject. The subject is simply the object that we are interested on observing it. The event that we are interested on observing is the event of placing 'X' or 'O' on the game board. When we go to the method play(int,int), we can see that the body is empty which means the observer design pattern will have a role on that method.

The GameBoard Class

In simple words, this class has the main game logic. It represents a paper where the players will draw the grid for the X-O Game. The grid is usually of size 3x3 but in some variations of the game it can be larger. The game board will be observing the players as they place 'X' or 'O'. When a player finish his turn, the game board will do the following, First, it checks if the move is valid or not. After that, it checks if the player has win the game or not after his move and finally, it switches turns (If it was P1 who has played, P2 will be next).

The Game Class

This class implements the Runnable interface. It acts as the main engine for running the game. It has the functionality to get the input from the players. Also it has the functionality to validate the input.
The following flow chart shows the execution steps of the game.
X O Game Flowchart
This flow chart shows the flow of events when running the game.

The Observer

The first building block of the observer design pattern is the observer. In java language, the observer is usually an interface that has method signatures only. In java language terminology its known as a listener. So, we will create a new java interface. Let's call the new file PlayerListener. From the name of the interface, we can infer that the class that will implement the interface will act as an observer (or listener) to the player.

Java Code

1 2 3 4
public interface PlayerListener {

}

The action that we are interested in is when the player puts an 'X' or 'O' on the game board. For that reason, we will include a method called 'play()'. The method parameters depend on what information the observer needs from the subject. In this case, the observer (the game board) needs to know the following; The source player (Player 1 or 2), the row index of his move and the column index of his move. Also we need the character that the player will place on the game board ('X' or 'O'). We can get it from the source player of the event.

Java Code

1 2 3 4
public interface PlayerListener {
    public boolean play(Player source, int rowIndex, int colIndex);
}
We are done with this interface. The next thing we need to work with is how to make the player notify the observer about the move that the player did.

Attaching Observer to The Subject

Remember that the subject in the game is the Player object. In java terminology, the subject is called listenable, and attaching an observer to the subject is called adding listener. The first thing we will do is to add extra attribute to the class Player. The attribute will be of type ArrayList<PlayerListener>. Simply we create an array list that will hold all the objects that will observe the player.

Java Code

1 2 3 4 5 6 7 8 9 10 11 12 13 14

import java.util.ArrayList;
public class Player {
    ArrayList<PlayerListener> listeners;

    //other attributes...

    public Player(int id){
        this.listeners = new ArrayList<>();

        //other code...
    }
}

After that, we need to add new method that we will be using to attach listeners (or observers) to the player.

Java Code

1 2 3 4 5 6 7 8 9 10 11 12 13 14 15 16 17 18 19 20 21 22 23

import java.util.ArrayList;
public class Player {
    ArrayList<PlayerListener> listeners;

    //other attributes...

    public Player(int id){
        this.listeners = new ArrayList<>();

        //other code...
    }

    public void addPlayerListener(PlayerListener listener){
        if(listener != null){
            this.listeners.add(listener);
        }
    }

    //other code...

}


Notifying Observers

The final thing that we will do with the Player class is to add the code inside the method play(int,int). In this method, we will only notify the observers about the player's move. We will do that using enhanced for-loop. In reality, we might have other actions that will be performed by the subject before notifying observers. Usually the notify step is the last step on the action that the subject performs.

Java Code

1 2 3 4 5 6 7 8 9 10 11 12 13 14 15 16 17 18 19 20 21 22 23 24 25 26 27 28 29 30 31 32

import java.util.ArrayList;

public class Player {
    ArrayList<PlayerListener> listeners;

    //other attributes...

    public Player(int id){
        this.listeners = new ArrayList<>();

        //other code...
    }

    public void addPlayerListener(PlayerListener listener){
        if(listener != null){
            this.listeners.add(listener);
        }
    }

    public void play(int rowIndex, int columnIndex){
        for(PlayerListener l : this.listeners){
            l.play(this,this.x_or_o,rowIndex,columnIndex);
        }
    }

    //other code...

}


Once we do that, we are done with the Player class and the observer design pattern is ready. Now we need to test it and see if it works. To do that, we will make the class GameBoard observes the player.

Implementing the Interface PlayerListener

As we have said before, the observer in our game is the class GameBoard. What we need to do is to make the given class implement the interface PlayerListener. Keep in mind that any class is interested on observing the player must implement the interface PlayerListener which acts as an observer.

Java Code

1 2 3 4 5 6 7 8 9 10 11 12

public class GameBoard implements PlayerListener{
    //other code...
    @Override
    public void play(Player source, int rowIndex, int columnIndex){

    }

    //other code...

}

Inside the play(Player,int,int) method, we need to do the actions that the observer must do after the subject notify it. When the player plays his turn, we need to do the following:
  • Check if the given place for the move is empty (No one has placed 'X' or 'O' before in it).
  • If empty, Do the following:
    • Place the character that the player is using for his move in the given place.
    • Update turn.
    • Check if the source player is a winner after his move.
  • If not empty, display error message.
Note that the variable 'turn' of type integer and the variable 'winner' of type Player are already defined. Also the game grid is ready. All what we have to do is to use them. Finally, the process of checking for the winner is ready. All what we have to do is to call the method 'isWinner()'.

Java Code

1 2 3 4 5 6 7 8 9 10 11 12 13 14 15 16 17 18 19 20 21 22 23 24 25 26 27 28 29 30 31 32

public class GameBoard implements PlayerListener{
    //other code...
    @Override
    public void play(Player source, int rowIndex, int columnIndex){
        //first check if the place that the player will play on is empty.
        if(this.gameGrid[rowIndex][columnIndex] == null){
            //switch turns
            if(turn == 1){
                turn = 2;
            }
            else if(turn == 2){
                turn = 1;
            }

            //place the 'X' or 'O' on the grid
            this.gameGrid[rowIndex][colIndex] = source.getChar();

            //check if the source player is the winner
            if(this.isWinner()){
                this.winner = source;
            }
        }
        else{
            System.out.println("Choose Another Place to Play!");
        }
    }

}


Once we complete this step, we are done with the class GameBoard. The last step before we see the result is to attach the GameBoard as a listener to the players.

Attaching The Observer to The Subject

The process of attaching the GameBoard to the players is performed inside the class Game. To be specific, inside the constructor. After we initialize the class attributes, the final step is to attach the GameBoard to both players.

Java Code

1 2 3 4 5 6 7 8 9 10 11 12 13 14 15 16 17 18 19

public class Game{

    //class attributes...

    public Game(){
        this.gameBoard = new GameBoard();
        this.firstPlayer = new Player(1);
        this.secondPlayer = new Player(2);
        this.firstPlayer.setChar('X');
        this.secondPlayer.setChar('O');

        //adding the game board as a listener to both players.
        this.firstPlayer.addPlayerListener(this.gameBoard);
        this.secondPlayer.addPlayerListener(this.gameBoard);
    }
}

Once we attache the observer to the subjects, we can test the game and see the result. But before we do that, let's look at the place where we call the method 'play()' of the class player. There are two places, one is at line 96 for player one and the other is at line 99 for player 2.

Java Code

1 2 3 4 5 6 7 8 9 10 11 12 13 14 15 16 17 18 19 20 21 22 23 24 25

public class Game{

    //other code...

    public void run(){

        //other code...

        /*
        when the method 'play() of the class 'Player' is called, 
        the game board is notifyed since it is observing the player.
        */
        if(turn == 1){
            this.firstPlayer.play(rowIndex, columnIndex);
        }
        else{
            this.secondPlayer.play(rowIndex, columnIndex);
        }

        //other code...

    }
}

If you check the code of the method 'run()', you can see that we did not touch the variable 'gameBoard' except for getting the turn. The rest is done automatically through the observer design pattern.

Summary

Implementing the observer design pattern in java language involve the following steps:
  • Creating the observer (Java Interface).
  • Creating a list on the subject to maintain the observers.
  • Add a method inside the subject that can be used to attache observers.
  • Notify all the observers using a loop once the event of interest accrues.
  • If a class is interested on observing the subject, he must implement the interface that represents the observer of that specific subject.
Also it is possible to include additional functionalities such as removing an observer from the subject or notifying observers without the need for the event to happen.

Thursday, June 15, 2017

Java Basics: Variable Naming Rules and Conventions

One of the important things to learn regarding java programming language is what is allowed and not allowed in choosing the name of a variable. Basically there are rules for choosing the name of a variable and there are conventions. In this post, we will be learning about the rules that govern variable naming in java language in addition to the conversions that is used by any java developer. We will include code examples to illustrate naming rules.

Naming Rules

1 - Variable name can start only with a letter, underscore (_) or dollar sign ($).

//This is allowed
int firstNum;

//This is allowed
int FirstNum;

//This is allowed
int _firstNum;


//This is allowed
int $firstNum;


//This is not allowed
int !firstNum;


2 - Variable name can contain numbers after the first letter.

//This is allowed
int burger1;


//This is not allowed
int 1burger;

//This is allowed
int burger2;


3 - Variable name cannot contain spaces or special characters.

//This is not allowed
int burger 1;

//This is not allowed
int burger-2;

//This is not allowed
int burger(3);


4 - Uppercase name differ from lower case.

//This one variable
int burger;


//This one is another one
int BURGER;

//Also this one is not same as above
int BURGer;


5 - Java keywords cannot be used for variable name (e.g. void).

//not allowed
int void;


6 - The length of the variable can be of any length.

Naming Conventions

Naming conventions are used by the developers to understand the meaning of a variable. For example, if you wrote a code and someone else reads that code, he will be able to understand your code easier if you use naming conventions. I my self follow the given conversions when I write Java code.

The following naming conventions are good to follow when you start writing your code:

  • Do not use dollar sign or underscore in the name of your variables.
  • Use meaningful names.
  • Use uppercase letters for the constant variables(e.g. PI = 3.14).
  • If the constant has two words, use underscore to separate words (e.g. MAX_SIZE = 4).


Tuesday, June 6, 2017

Java Basics: Type Casting


What do we mean by "Type Casting"?
Type casting is basically the process of changing or converting one variable from one data type to other different data types. For example, we may want to convert an integer variable data type to a long data type. For the primitive data types, The type casting can be performed only on the numbers. We can think of a char data type as a number since it is one of the Integral Data Types. We cannot perform casting on boolean.

What is an Integral Data Type?
An integral data type is a data type that represents a subset of the infinite integer set (such as byte, short, int, char, long in Java Language).
For the primitive data types, we have two types of conversion:
  • Narrowing primitive conversion
  • Widening primitive conversion
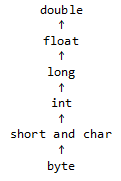
Before we continue with the meaning of each one, we have to know few things. Java data types are grouped into 3 groups, The Integral Types, Floating and the boolean. The integral group contains the types that does not have a decimal point. It includes the int, byte, short, long and the char. The floating group contains the types that has a decimal point. The floating group contains two data types, the double an the float. The boolean group contains only the boolean data type. Each data type has a specific size. The double is 64 bits, the long is 64 bits, the float is 32 bits, the int is 32 bits, the short is 16 bits, the char is 16 bits and the byte is 8 bits.

The next table shows the summary of data types sizes.

GroupData TypeSize
Floatingdouble64 bits
float32 bits
Integrallong64 bits
int32 bits
short and char16 bits
byte8 bits


Widening Primitive Conversion

Sometimes called Automatic Type casting. It can happen when we try to cast a small size type to a larger size type. For example, we may want to convert from a short to an int. Also we can cast from Integral type to floating type in widening primitive conversion.

GroupData TypeSize-
Floatingdouble64 bits
Widening Primitive Conversion 1
float32 bits
Integrallong64 bits
int32 bits
short and char16 bits
byte8 bits
This type of casting does not require any special thing in order to be completed. The next code example shows how it can be done.


public class Main{
  public static void main(String [] arguments){

    //the original value
    byte myByte = 65;

    //changing from byte to short
    short byteAsShort = myByte;

    //changing from byte to integer
    int byteAsInt = myByte;

    //changing from byte to double
    double byteAsdouble = myByte;

    //from long to double. Notice the 'L'
    double longAsDouble = 77L;

    //from float to double. Notice the 'F'
    double floatAsDouble = 67F

    System.out.println("byte = "+myByte);
    System.out.println("byte as short = "+byteAsShort);
    System.out.println("byte as integer = "+byteAsInt);
    System.out.println("byte as double = "+byteAsdouble);
    System.out.println("byte as double = "+byteAsdouble);
    System.out.println("long as double = "+longAsDouble);
    System.out.println("float as double = "+floatAsDouble);
  }
}

Widening Primitive Conversion 2


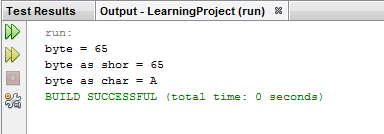
One thing to notice about widening primitive conversion is when we try to cast a byte or a short to a char. In order to cast from byte to char, we have to till the compiler that we are changing from byte to char. Same thing apply when we are casting from short to char. The following code example shows how to do that.


public class Main{
  public static void main(String [] arguments){

    //the original value
    byte myByte = 65;
    //changing from byte to short
    short byteAsShort = myByte;
    //changing from byte to character. Notice the '(char)' thing that we have added
    char byteAsChar = (char)myByte;
    System.out.println("byte = "+myByte);
    System.out.println("byte as short = "+byteAsShort);
    System.out.println("byte as char = "+byteAsChar);
  }
}

Widening Primitive Conversion 3


Narrowing Primitive Conversion

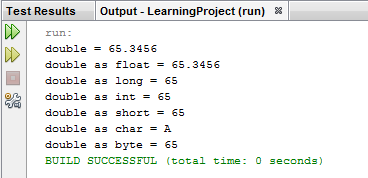
Narrowing primitive conversion is the opposite of Widening primitive conversion. What we do is we convert a larger size data type to a smaller one. To complete this task, we have to tell the compiler explicitly about the conversion. We do that by doing the same thing when we wanted to convert from byte to char.

GroupData TypeSize-
Floatingdouble64 bits
Narrowing Primitive Conversion 1
float32 bits
Integrallong64 bits
int32 bits
short and char16 bits
byte8 bits

The following code example shows how it is done.


public class Main{
  public static void main(String [] arguments){

    //the original value 
    double myDouble = 65.3456;
    //changing from double to float 
    float doubleAsFloat = (float)myDouble;

    //changing from double to long
    long doubleAsLong = (long)myDouble;

    //changing from double to int 
    int doubleAsInt = (int)myDouble;
     
    //from double to short 
    short doubleAsShort = (short)myDouble;

    //from double to char
    char doubleAsChar = (char)myDouble;

    //from double to byte 
    byte doubleAsByte = (byte)myDouble;
    System.out.println("double = "+myDouble);
    System.out.println("double as float = "+doubleAsFloat);
    System.out.println("double as long = "+    doubleAsLong);
    System.out.println("double as int = "+doubleAsInt); 
    System.out.println("double as short = "+doubleAsShort);
    System.out.println("double as char = "+doubleAsChar);
    System.out.println("double as byte = "+doubleAsByte);

  }
}

Narrowing Primitive Conversion Example Output


What Happened to the Decimal Point when We cast from float or double to a type that has no Decimal Point? When we cast from floating type to integral type, the number will be always truncated (the numbers after the decimal point will be cut down).


public class Main{
  public static void main(String [] arguments){

    //the original values
    double firstDouble = 88.49;
    double secondDouble = 88.50;
    double thirdDouble = 600.90;
    double fourthDouble = 600.0001;

    //changing from floating to integral type
    int firstDoubleAsInt = (int)firstDouble;
    int secondDoubleAsInt = (int)secondDouble;
    int thirdDoubleAsInt = (int)thirdDouble;
    int fourthDoubleAsInt = (int)fourthDouble;

    System.out.println("first double = "+firstDouble);
    System.out.println("first double as int = "+firstDoubleAsInt);
    System.out.println("second double = "+secondDouble);
    System.out.println("second double as int = "+secondDoubleAsInt);
    System.out.println("third double = "+thirdDouble);
    System.out.println("third double as int = "+thirdDoubleAsInt);
    System.out.println("fourth double = "+fourthDouble);
    System.out.println("fourth double as int = "+fourthDoubleAsInt);
  }
}

Narrowing Primitive Conversion Example Output


Saturday, April 29, 2017

G-Lib, a Weighted Grade Point Average Library For Java

Hello everyone. I'm more than happy to announce the release of G-Lib 1.2, one of my programming projects. The name 'G-Lib' Stands for 'Grader Library'.

What is G-Lib?
G-Lib is a java-based library  that can be used to create a custom grade point average (GPA) scales and use them to grade any thing that needs a weighted grading scale. It can be used to grade courses, quizzes, homeworks and even more. The simplest use of the library is to create a GPA calculator using out of 4 or 5 scale. But the library does not limit the developer to only this. It can be used in many other ways.

You can read more about the library and the idea behind it by visiting the following link: Introduction to G-Lib

Library Features:
  • The ability to grade any thing uses weighted grading scale (Generics support).
  • Support for the most commonly used weighted scales.
  • Support for creating custom grading scales.
  • Support for event handlers.
Library Information:


 Here are few resources that can help in getting started with G-Lib:
In case you needed any help regarding anything, please feel free to contact me using this blog or by using  the following email: support@programmingacademia.com.


Last Updated: 29/4/2017

Monday, March 13, 2017

Java Enums, How to Use Them Correctly

When I learned about java enums (or enumerations), I thought that there was only one way of creating and using them in java programming language. The first time I have heard of enums was during a course called ICS 201 at KFUPM. In reality, they did not tell us about them. I just found about them while I was trying to solve problem related to showing day name in more than one language. Enums usually used to store static data that will never change through the life time of a program such as the name of days.

Before you continue with the lesson, Note that you must have the knowledge about the Following: 
  • Crating Java Files.
  • Using Main Class. 
  • Using Variables and Creating Objects.
  • Method Declaration.
  • Building Java Classes.
In this lesson we will be learning about the following:
  1. Java Enum Syntax.
  2. How to Travers All Enum Constants.
  3. Using Enum With Switch Statment.
  4. Customizing The Enum.

The Basic Syntax

There are two ways for creating enums in Java language, the easy way and the hard way. For now, let's talk about the easy way.

Suppose that a student is studying at university. The university classify students into 5 different categories, New Student, Freshman, Sophomore, Junior and Senior. We can use Java enum to store the values as follows:

public enum StudentLevel {
    NEW,FRESHMAN,SOPHOMORE,JUNIOR,SENIOR
}


This is the simplest way for creating enums in Java. The keyword 'enum' indecates that we are extending (or inherting from) the class Enum. This class is the base for all enumerated types in java language.

Now let's create new class and call it 'Student'. Inside our student class, we can have an attribute called 'level' which has the type 'StudentLevel'. We can set this attribute to any constant value that we have defined inside the "StudentLevel" enum.

public class Student {
    private StudentLevel level;
   
    public StudentLevel getLevel() {
        return this.level;
    }
   
    public void setLevel(StudentLevel level) {
        this.level = level;
    }

    public String toString(){
        return "Student Level: "+this.level;
    }
}


Finally, we create a min class to test how the code will work. We create an object of type student and set the level as follows:

public class Main{
    public static void main(String [] arguments){
        Student s = new Student();
        s.setLevel(StudentLevel.NEW);
        System.out.println(s);
    } 
}


When we run the program in NetBeans IDE, the output will be as follows:


Traversing Enum Values 

To print the values of all the constants inside the enum, we use the enhanced 'for' loop to do that. The following code snippet shows how its done.

public class Main{
    public static void main(String [] arguments){
        for(StudentLevel level : StudentLevel.values()){
            System.out.println(level);
        }
    } 
}

The Method 'values()' return an array that contains all the constants within the given enum. This program will show the following in the console:


Using The Enum With 'Switch' Statment

Most of the time, the enums are used within switch statement. We will use the same example that we used above to illestrate how to use the enum with switch statement. Depending on the assigned value for the attribute 'level', we can do different things.

public class Main{
    public static void main(String [] arguments){
        Student s = new Student();
        s.setLevel(StudentLevel.SENIOR);
       
        switch(s.getLevel()){
            case NEW:{
                System.out.println("Welcom to the university.");
                break;
            }
           
case FRESHMAN:{
                System.
out.println("Do your best, You still have 4 more years to go");
               
break;
            }
           
case SOPHOMORE:{
                System.
out.println("Finsh this year and you will be graduated in 3 years.");
                break;
            }
           
case JUNIOR:{
                System.
out.println("Two more years left");
               
break;
            }
           
case SENIOR:{
                System.
out.println("You did work hard. This is your final year!!");
               
break;
            }
        }
    } 
}


Customizing Enums

So far, we have seen the basic use of enum. But what if we would like to add more extra information inside the enum? For example, we may need to associate a range of credit hours for each level. This can be done by creating a constructor inside the enum that accepts parameters. By default, java provide an empty constructor for the enum. Now let's modify our basic enum and create a custom constructor in addition to the attributes that we need.

What we will do is to create a constructor that accepts 3 parameters, a name of type string and two other parameters of type integer. The name is just used to change how the name of the constant appears. By default, it appears in the way we define it. For example, if the name of the constant is 'SuNdAY', it will show as 'SuNdAY' in the console. By overriding the "toString()" method, we can change this.

Also we will create methods inside the enum to access the new attributes.

public enum StudentLevel {
    NEW("New Student",0,15),
    FRESHMAN("Freshman",16,45),
    SOPHOMORE("Sophomore",46, 70),
    JUNIOR("Junior",71, 90),
    SENIOR("Senior",91,132)
    //notice the semicolon here instead of a comma
    ;
    //the keyword final is optional
    private final int minCH, maxCH;
    private final String name;
   
    private StudentLevel(String name,int minCreditHours, int maxCreditHours){
        this.name = name;
        this.minCH = minCreditHours;
        this.maxCH = maxCreditHours;
    }
   
    public int getMinCreditHours(){
        return this.minCH;
    }
   
    public int getMaxCreditHours(){
        return this.maxCH;
    }
   
    public String value(){
        return this.name;
    }
   
    public String toString(){
        return this.name+", Min Credits: "+this.minCH+", Max Credits: "+this.maxCH;
    }
}


So, what did we do to create this custom enum? We did the following:
  • Replace the default enum constructor with custom one.
  • For each constant, we have added the extra attributes as if we where calling a method.
  • To do that, we added semicolon after the last enum constant.
  • The things that come after the semicolon is similar to any java class declaration.
  • We can add methods, attributes and to any other thing inside.
Now if we loop through the constants of the enum, we will see something different from what we have seen before. The reason for that is because we created our own custom 'toString()' method.


We can even do more if we would like since we are working with the enum as class. For example, we may make our enum implement java interfaces.